You’ve been working on your WordPress website for weeks (possibly even months!) and you’re ready to release your brand new site into the wild.
So what’s the next step?
A website launch can be a daunting task, but if you understand the basics of domains, DNS and your hosting provider it’s not so bad!
We’ll break it down into easy steps to help you navigate the most important part of the website build process — the launch.
Disclaimer: Not all hosting providers handle launches in this exact way, and depending on which platform you’re using, the process may deviate. This is simply how a FreshySites launch works and the process behind it.
Step 1: Final Approval & Scheduling
The first step towards launching your site is submitting final approval. We make it easy and ask that you give your new FreshySite one final review before signing.
Once that’s submitted your Project Manager will be notified and will reach out to schedule the launch!
Because the launch process can take up to 24 hours to be fully complete, it’s important to plan ahead and schedule this well before any major event you may have.
At FreshySites we like to schedule launches for first thing in the morning or after core business hours.
Step 2: Pre-Launch Prep
The next step is to make sure your development site is prepped and ready to go! The FS team will handle this aspect for you if you’re hosting your website with us.
Our pre-launch checklist consists of the following:
- Review the full site to ensure there are no broken links
- Remove any unused themes and plugins
- Update all active themes and plugins
- Double check contact form notifications are routed properly
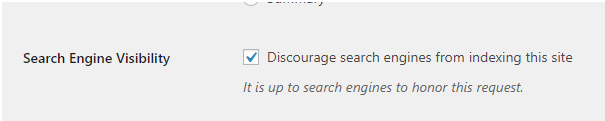
- Make the site visible for search engines
- In WordPress, you can adjust this by going to Settings > Reading and looking for the Search Engine Visibility checkbox.
- In WordPress, you can adjust this by going to Settings > Reading and looking for the Search Engine Visibility checkbox.
Once all of these steps are complete, we move on to the more technical aspects of the launch.
Step 3: Add Domain(s) to Your Hosting Provider
Depending on where your site is hosted, these exact steps may deviate.
The next thing we have to do in the process is to “tell” the hosting provider which domain the site should be on. FS covers this step for all clients who host on our platform!
If your new site is replacing an old site, you want to ensure that you launch the new site on the primary domain. This helps keep your search engine rankings in tact during the switch over.
A primary domain is either the non-www version of your domain name or the www version. For example freshysites.com or www.freshysites.com.
Even though these domains both go to the same site, these are technically considered different domains by Google and other search engines — we’ll come back to this later in this same step!
A quick way to check what your current site’s primary domain is a simple Google search. What appears under your website in the search console is the primary domain.
For instance, in green text in the screenshot below you can see our primary domain is the non-www version: freshysites.com
You can see this below:

If you’re launching a site on a brand new domain, you can choose what you’d like to set as your primary domain! By default, we choose the non-www version when launching brand new sites.
Once it’s determined what the primary domain is, we add that to your site install on our hosting platform and mark it as the primary domain.
As I mentioned earlier, Google and other search engines consider the www and non-www versions different domains, so we have to add the non-primary version to the install as well. This also ensures that if someone types in either version of the domain name, they are redirected to the same site!
Step 4: Change DNS Records
Disclaimer: This is another step FS handles for our clients as it can be pretty complex. If you work with an IT team or company we can simply let them know what changes need to be made. This is also a step that can greatly deviate depending on what platform you’re hosting on.
Now that the server knows which domain the site should be on, we need to tell the domain where to point.
Each server will have a unique IP address, which we will use to point the domain to that server. One of the best ways to describe an IP address is as follows:
A computer’s IP Address is like the physical address of a house. If someone calls a pizzeria to order a delivery, they need to provide their physical address. Without that address, the pizza delivery person will have no idea which house to deliver the pizza to! — Cloudflare
Typically you can find the IP address within your hosting provider’s account.
Once we have the proper IP address, we need to navigate to your domain registrar. This is where you purchased the domain — some common registrars are GoDaddy, Name.com, Register.com, Network Solutions, etc.
Once in the account, we navigate to the DNS Records (sometimes called a DNS Zone File) for the domain.
In this article, we won’t take a deep dive on DNS Records and what they do, but if you’re interested in learning the nitty gritty details, check out this great resource.
The DNS records can look a bit different in each registrar but it will always contain the basics: domain name, record type, value, and TTL (Time to Live).
The record we need to adjust is called an A Record. The ‘A’ stands for address and it indicates which IP address the domain is pointing to. This is where the IP address from your hosting provider comes in!
To close out the actionable launch steps, we replace the A record’s IP address with the new one.
To do this we replace the Value (sometimes called IP Address or Answer) field. We also set the TTL (time to live) as low as possible. Typically this is written in seconds, so a TTL of 3600 = 1 hour. Some registrars have a minimum TTL and only allow you to go 300 or 600 seconds.
See the screenshot below for a sample of what your A record may look like this:

Important DNS Considerations:
- We likely won’t be able to adjust any of the records if the DNS is not hosted within the domain registrar. Sometimes, especially when switching hosting providers, there is a more custom setup that requires a deeper dive. If that is the case FS is here to help! We’re well versed in launches and complex situations.
- As we touched on earlier, we need to account for both the www and non-www domains. Sometimes this means adding an additional A record for the non-primary domain, but it really depends on the setup of the particular domain and registrar. This is why we prefer direct access to the DNS records, however if you work with an IT team or company, they should be able to tackle this as well.
Step 5: Propagate & Wait
Hurry up and wait is the theme of this step!
Once the A record has been changed, it becomes a waiting game. The time your site takes to propagate, or show up everywhere throughout the internet, is dependent on many factors. Your individual internet service provider, network, domain registrar and geographical location all play a part in when you will see the new site up and running.
Earlier I mentioned that once started the process can take up to 24 hours and that is mostly due to propagation time.
Sometimes we see sites propagate in 1-2 hours and sometimes it can take much longer.
During this propagation period, you can (but not always!) experience current site downtime, formatting issues if you do see the new site and a “not secure” error.
All of this will resolve itself as the launch goes through, but because of this:
Our number one rule of launching is? Timing is everything!
The launch should be scheduled for a time when a small amount of (potential) site downtime won’t be a major issue and should NOT be scheduled the same day as a big event.
At FreshySites we prefer to launch sites first thing in the morning or off of your core business hours Monday-Thursday. If you know of an impending event, talk to your Project Manager about scheduling!
During this wait time, the FS team will monitor to make sure the launch is running smoothly.
Step 7: Launched!
Congratulations your site is live and in the wild!
When your site is 100% up and running, the FS team will reach out and let you know. If you have an E-Commerce shop we may ask you to run a live test transaction.
You’ll now have full admin access to your new site!
FS has a ton of resources on how to make edits and how to use your site:
- https://freshysites.com/training-videos/
- https://kb.freshysites.com
- https://freshysites.com/support/
FS is here to help with any post-launch questions or concerns!
Feel free to reach out directly to your Project Manager if you need help!
Did we tell you the new site is up, but you’re still not seeing it? Try clearing your device or browser cache. You can also test this out on a mobile device by disabling WiFi and strictly using data.
Important Notes & Things to Consider:
-
SSL/Security
We build all of our development sites with SSL security certificates, so this is baked right into our process! Not only is it best practice to maintain a valid SSL on your site for security reasons, but Google is now marking sites without one as insecure. This can also negatively affect your search ranking.
-
301 Redirects
If your old site had been around for a while and/or was very well established you may want to consider setting up 301 redirects. This helps protect any built up SEO value over time by redirecting links that no longer work instead of allowing a 404 Error (A “No Results Found” page).
-
Changing DNS Records
Certain changes to your DNS records can cause a disruption to your live website and any services — like email — you have associated with that domain. If you choose to make these adjustments on your own, proceed with care and caution! This is one part of the process that may be best left to an expert.


